- Continue Shopping
- Your Cart is Empty
Feeling Boxed In By CrossFit? Ready To Take Your Knowledge To Your Own Garage Gym Instead?
If the answer is “yes”, then you’re not alone! While CrossFit gyms exploded in the years 2011 through 2015, the once massively popular, cult-like, gritty exercise regimen has slowed down in popularity and appears to be in a consolidation phase, likely due to a confluence of events.
Continue Reading → View full article →The Full-Body Kettlebell Workout Move
Kettlebell exercises are a great combination of strength training and calorie burning that’ll keep all your muscle groups conditioned and help prevent osteoporosis, too. Why? Kettlebell exercises require different muscle groups to coordinate whenever you do a move, which means multiple toning, fat-burning benefits in less time. A single swing might engage your abs, legs, arms, and glutes at the same time.
Ready to give it a try? Here’s a simple exercise that will get you conditioned fast:
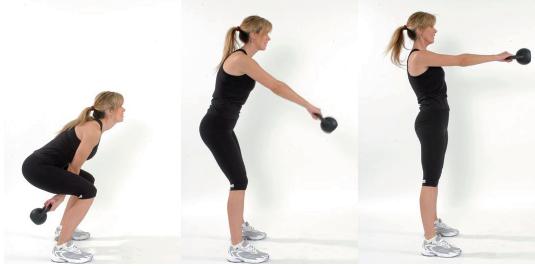
The Kettlebell Swing
- Stand with feet hip-width apart, knees slightly bent.
- Keeping back and arms straight, grab your kettlebell handle with both hands, knuckles out, facing away from your body.
- Lean forward from hips and swing the bell back between your legs
- In one motion, straighten legs and push hips forward to propel the kettlebell up
- Lower slowly down and repeat
Using the momentum generated from your hips and thighs protects your back, firms your butt and thighs, and works your abs, too. Slowly lower the ball while maintaining control to give your arms a nice workout as well.
The Most Effective Wall Ball Exercise Ever

Want to try a wall ball / medicine ball workout, but not exactly sure what to do? Try this medicine ball toss. Here's the correct technique for executing a wall ball exercise that works your entire body, strengthens muscles, and will get your heart pumping, too.
- First things first: pick your ball. If this is your first time using a wall ball, you'll want one in the 5–10 pound range. If you're a little more advanced, try one between 15–20 pounds instead.
- Next, get your posture right. It protects your back and knees from injury (and it's just good form, too). You'll want to stand facing a wall with your feet shoulder-width apart, your back straight and your shoulders wide.
- Hold the wall ball right in front of your sternum.
- With your back still straight and your chest up, dip into a low squat until your thighs are parallel to the ground. Don't overextend by going lower, and check yourself to make sure you aren't leaning forward as you do this.
- Now pop up, pushing through your heels, and toss the ball up to the wall.
- Catch the ball as it's coming back down, lower into a squat again, and repeat for reps.
What Makes A Great Garage Gym?

When you’re building a DIY garage gym, you don’t need a ton of equipment or bulky machines. With a little organization and forethought, you’ll have everything you need to do the day's workout with our garage gym checklist and enough space to park a Ford Explorer, too.
Here’s a list of garage gym essentials that allow you to do any workout sequence without needlessly junking up your garage:
- Barbell
- Kettlebells (at different weights, depending on your needs)
- Weight Plates in 5, 10, 25, 35, & 45 lbs.
- Parallettes
- Olympic rings
- Plyometric Box
- Wall Ball
- Slam Ball
- Concept 2 Rower
- Jump Rope
- Climbing Rope
- Yoga Mat
Got your garage gym essentials? Great—now all you need is the right setup. The rower and barbell may seem like a challenge, but remember: both of them can be stored vertically. Whether you choose hooks, shelves, or simply leaning them against the back wall, the amount of space they take up is negligible.
Next, you’ll want storage for balls, ropes, and mats to keep them within reach but neatly organized. This is when you can get sly and just turn your plyo box over to make it a convenient equipment bin.
Your kettlebells and weight plates are too heavy duty for a regular storage container, so you’ll want a rack. Rolling racks are great if you just want to stack and go, but make sure there are brakes on the wheels so the entire unit isn’t rolling around your garage (or into you).
Five Tips for a Correct Kettlebell Snatch

Kettlebell workouts seem pretty straightforward, but as with any exercise — and especially those involving weights or functional movement—technique is extremely important to avoid injury. So how can you perform a kettlebell single arm snatch routine to get fit without getting hurt?
Here are five tips to ensure you’re doing kettlebell exercises the right way (and if you need a visual reference, here’s a great video to check out):
- Don’t think of the kettlebell snatch technique as a series of big swings. It’s actually four separate, tightly controlled arcs: one from between legs to shoulder, one from shoulder to above the head, then two more of the same arcs back down. Remember: if you’re not in control of your exercise equipment, you’re not in control of the workout.
- For the first arc, always make sure to bend your elbow when you have the kettlebell at shoulder height. That way, you can press up into the next arc, giving you a better workout and keeping you from pulling a muscle, too.
- For the second arc, the one that goes from shoulder to above the head, straighten out—but never lock—your elbow.
- Use a lighter kettlebell than you normally would. Snatches tire muscles out quickly, and relying on the kettlebell’s momentum instead of maintaining good form and proper control could injure your arms, shoulders, or back.
- Don’t twist your arm or wrist. It’s tempting to rotate your elbow in when you straighten up to go above your head, but your elbow should stay rotated out, away from your core, and your wrist should remain parallel with the kettlebell grip.
© 2026 Rally Fitness LLC. Created by Black Bambu Inc.


